
In this article I am going to show how to build a Cloud-Native pipeline using Openshift Pipelines. Pipelines have been around for a long time already. How can we still improve it? Do we need to? During the last few years we have been creating a massive amount of them by using technologies that are still “not quite there” in terms of what the Dev and Ops communities are looking for. Tools like Jenkins, Gitlab CI, and others have done a good job (to be fair), but they seem to be more like a general purpose tool for cloud technologies than something built for it. The way we have been integrating these tools to Kubernetes was either to provision hosts dedicated to run our pipeline jobs or to create what we may call a build pod to be provisioned inside the same Kubernetes infrastructure to execute our pipeline into it by using scripts and plugins that interacted with Kubernetes API in a very limited way, for example, using Jenkins Pipeline DSL. And in many cases we were still doing what we did with that old (and dusty) builder machine that had all dev and ops stuff installed there to be able to execute those automated scripts. Everything running in the same VM or image.
On the other side, we are seeing the community evolving their platforms, products, and tools leveraging a more Kubernetes native approach using Custom Resources and Operators. And this new wave comes with a lot of advantages, such as, perform a lot more “advanced” use of the Kubernetes API and reuse a whole ecosystem that was built around the Kubernetes API and provision the image that we want in a so granular approach that will make things much less complex to maintain. By the end of this article, you will understand the concepts and how to build your pipelines in a Cloud-Native way.
Note There is nothing really wrong with your Jenkins or other tools that can help you deliver pipelines. If you have one, you are in a good shape. The discusion here is that these tools can be really hungry for resources once it get’s a lot of load, they are hard to maintain, and are difficult to scale. So, the approach here is to have a controller which has a very small footprint that uses Kubernetes enviornment to scale as desired once it is required and have as many containers as desired to complete the smallest step.
The concept of what is a pipeline can be very opinionated, so the pipeline I considered to build in this article is one that follows some best practices, but also is not too complex that would make it go into a direction that can not be reused in other scenarios. So, we are going to create a pipeline that has a good foundation and can also be extended in other much more complex scenarios.
Openshift Pipelines is a CI/CD solution based on Tekton and is tigthly integrated to Red Hat Openshift. The web console has some features that helps a team in many different such as dashboards that, among other things, create an easy-to-follow way to observe what is happening in your pipelines.
Tekton is an opensource project which provides a Kubernetes native CI/CD (Continuous Integration and Delivery/Deployment) solution. It allows developers to build, test, and deploy their applications into any Kubernetes cluster. This project has a vibrant community that includes companies like: Google, Red Hat, and many others. The current project state is in beta with a lot of features to come.
Tekton distilled
Tekton is built upon four main components
- Pipeline CRDs: It’s comprised of all the following
CRDs.TheseCRDscomposed of several other attributes that are used to implement a pipeline:Task: is used to implement atomic activities to perform as a single unit with a set of steps. For example, to build an application you may have to prepare the environment before executing the source code compilation. So, each activity that is part of a single task is called a step. Every step is executed in the same order that it is defined in the task. Each step can have it’s own image, so inside Kubernetes these steps become a container inside the same pod. A task can also define some external requirements such as storage, inputs and outputs.TaskRun: is the runtime definition of a task. The TaskRun allows you to provide the actual persistent storage for the task, what are its inputs and outputs, if there is any. When we create one in the cluster, the operator starts a pod definition for the referred task and execute it by attaching all external attributes defined in the TaskRun. It’s possible to run tasks individually.Pipeline: is a wrapper for several tasks that can be used to deploy an aplication, configure something in the cluster, or whatever is necessary. Each task defines an optional predecessor to create the chain. There are some additional attributes that can be used to make it more resilient to errors and conditions of when the task needs to run. Take a look at Tekton docPipelineRun: has a similar concept to what a TaskRun is for a Task but in this case for a Pipeline. It is required in order to run a Pipeline. So, it defines what would be the real external resources that can be used in a pipeline.PipelineResource: A PipelineResource is a way to reuse some internal features that Tecton provides without having to create a task for it. Tekton still have only a few of them and in many situations they have counter-parties as tasks. The can be used in a Task or a Pipeline as inputs and outputs. Some examples are:- Git Resource: This one has the capability of checkout the source code from a git repo. With minor issues see Conclusion;
- Image Resource: This one has the capability of push an image to a repository;
- Storate Resource: This one has the capability of creating storages in general, but mostly inside GCS;
- Cloud Event Resource: This one has the capability of sending events to whatever is being listening to. Just like any other webhook that we configure to notigy other applications;
- CLuster Resource: This one creates resources in an external cluster;
- Controllers: are the main orchestrators that are responsible to monitor and react from newly created CRs to execute tasks and update Kubernetes API. Here follows more details regarding what exactly each one does:
tekton-pipelines-controller: is a Tekton - K8S Controllertekton-pipelines-webhook: is a K8S Dynamic Admission Webhook to validate/mutate Tekton CRstekton-triggers-controller: is a Generic/GitHub WebHook - K8S Controller. It’s the controller that manages tektoncd/triggers structures and create services for each EventListener (that can be used as GitHub webhook if published, using ingress, openshift routes, or something else)tekton-triggers-webhook: is a K8S Dynamic Admission Webhook to validate/mutate Tekton Triggers CRs
- Event Listerners: is used to expose and endpoint to enable integrations with git repositories and receive webhooks requests. It is very flexible with mapping JSON fields, and binding and creating Tekton’s CRs. Using
CRCit is commonly exposed via openshift routes. - CLI Tool: is the famous
tkncommand line that we use to see logs, list, create, describe all kinds of Tekton’s CRs that we have created throughout the creation of a pipeline. Besides, it is capable of retrieve all logs from all tasks belonging to the same pipeline in a single-shot.
Architecture overview
The following architecture explains how each components interact between them:
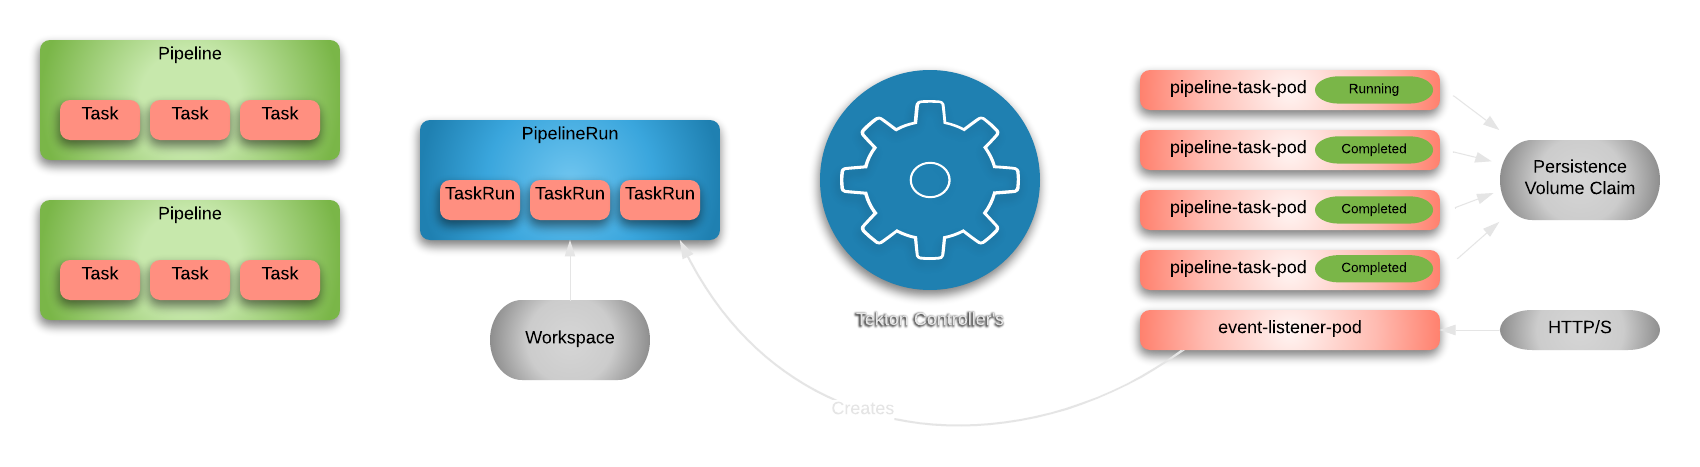
The first step is to create our definitions or CRs that have what every Step, Task, and the Pipeline is composed of everything that is necessary to get that application component to our environment. After that we have what we call runtime PipelineRuns and TaskRuns components that define what are the actual git repository or where the pipeline should store their components in the runtime.
So, once we have all these components properly configured in the cluster we need something that creates the actuall pods and our containers to ultimately start executing things and that’s when the Controllers come into the party. The Controllers tries to guarantee that for each PipelineRun there is a set of pods created for each task and also making sure that the desired chain order is being followed.
And finally, we have what we call the event listerner pod that is responsible to receive any payload that comes from another application. It exposes a service to the world by using a Kubernetes ingress or an Openshift route. There are some CRs responsible to extract, map, and create the templates necessary to create the CRs once it receives the call from any of the git repositories of other applications.
Pipeline overview
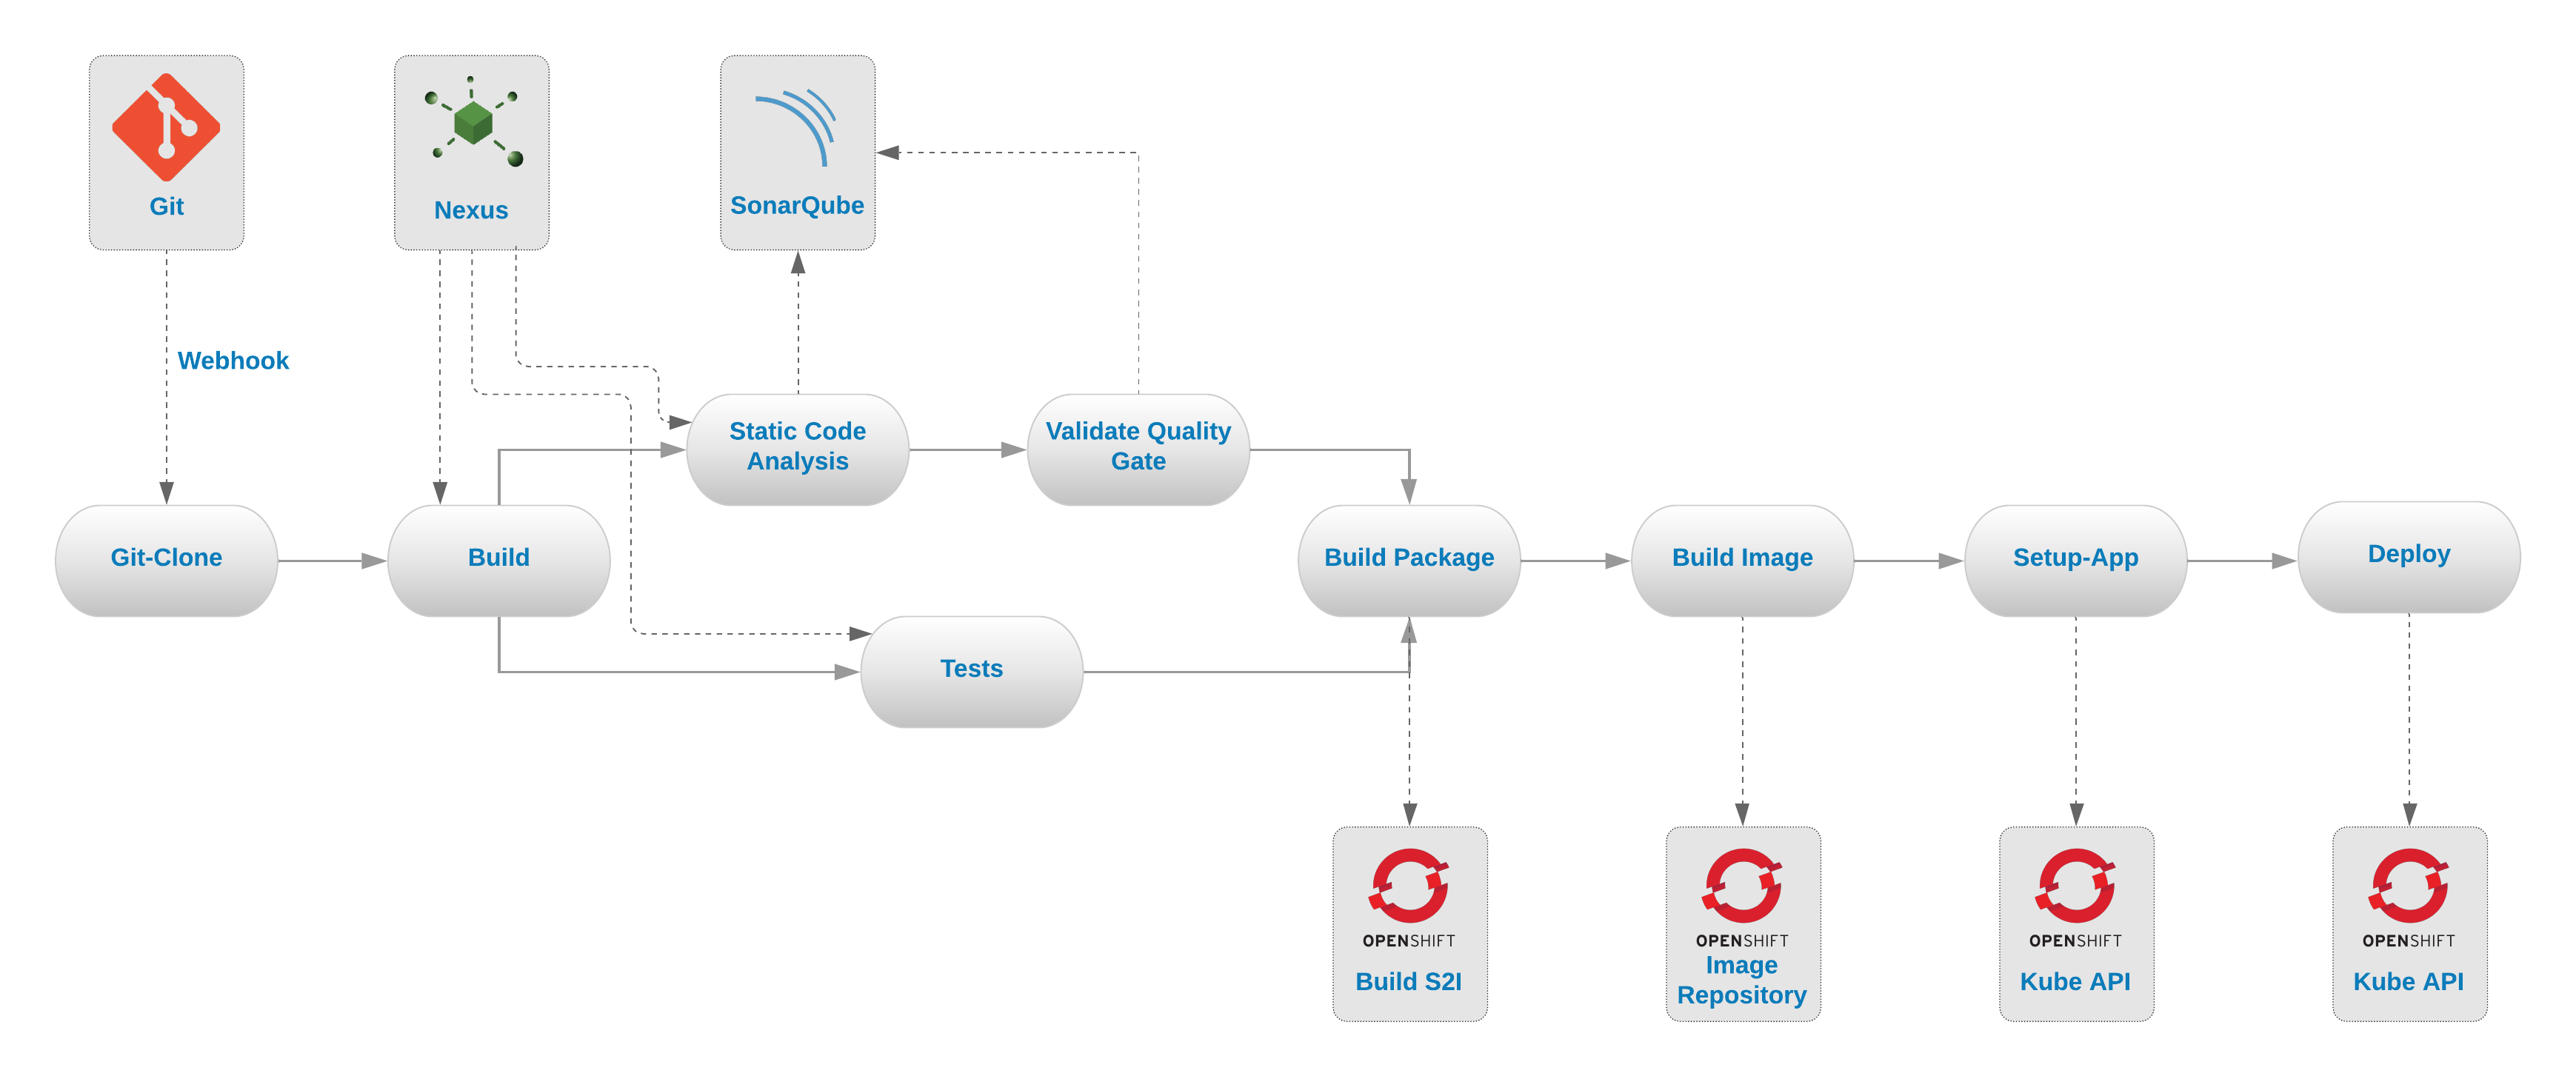
This pipeline was designed to perform builds using a Quarkus application, but that does not prevent you from building following the same idea any other languages.
The pipeline that we are going to build has the following steps:
- Git-Clone - This task is used to clone a repository.
- Build - This task is used to build the source code. In these following links you can find tasks for other languages.
- Tests - This task is used to run the unit tests.
- Static-Code-Analysis - This task is used to perform the code analysis using SonaQube.
- Validate Quality Gate - This task is used to validate the quality gate results by quering its API and ensure that the code has no major issues.
- Build-Package - This task is used to create the unified package for the S2I build.
-
Build-Image - This task is used to run the S2I build using the binary approach to create a the container image and store it directly in the internal repository.
Note We could use here the current builders implementation that are available in the Tekton’s and Openshift’s catalogs, but that would require us to provision priviledged containers to run the image builds. Which if in your case this something unecessary, you can change that and go back and use the regular builders. But, I recommend you to not choose this path if you can the alternative to run the s2i builds inside your cluster that does not require you to attenuate the security of your cluster. For more information regarding s2i builds see this documentation.
- Setup-App - This task is used to provision the app’s Kubernetes configurations in the cluster without any triggers.
- Deploy - This task is used to execute the rollout using the latest version of the deployment.
NOTE One thing that it’s going to be used on other versions of this tutorial is to have a way to validate the deployment success.
These tasks are chained as in the following diagram:
Installing and configuring Tekton
First, we will need the tkn client to perform some necessary tasks during the article. You can install it by following this instructions here.
Verify if it is installed correctly:
$ tkn version
Client version: 0.9.0
Pipeline version: v0.11.3
In order to deploy and test our pipeline setup in a Kubernetes environment we will use the Code Ready Containers (CRC) environment. Code Ready Containers will spin up a cluster, which is an all-in-one cluster or both master and worker node, in your local machine. So, if you don’t have it already there you can follow the installation process in this link here.
After having the CRC up and running, let’s install the Openshift Pipelines Operator witch is based on version v0.11.2 of Tekton. The process that we will go here is using the kubectl and oc command-line interface (CLI).
kubectl get packagemanifests/openshift-pipelines-operator \
     -n openshift-marketplace -o yaml | yq r - \
     "status.channels[*].name" --collect
The result will be something like:
- canary
- dev-preview
Subscribe to the canary channel of openshift-pipelines-operator. This is going to create the ClusterServiceVersion of the version 0.11.2.
$ cat << EOF | kubectl apply -f -
apiVersion: operators.coreos.com/v1alpha1
kind: Subscription
metadata:
  name: openshift-pipelines-operator
  namespace: openshift-operators
spec:
  channel: canary
  name: openshift-pipelines-operator
  source: community-operators
  sourceNamespace: openshift-marketplace
EOF
The result will be something like:
subscription.operators.coreos.com/openshift-pipelines-operator created
And after a few minutes you will see a new namespace called openshift-pipelines in the list of existing namespaces which is where the tekton operators will be running.
kubectl get pods -n openshift-pipelines
The result will be something like:
NAME                                          READY   STATUS    RESTARTS   AGE
tekton-pipelines-controller-b6856f8cb-27w8k   1/1     Running   0          3d21h
tekton-pipelines-webhook-6d8b4c5644-4qf9w     1/1     Running   0          3d21h
tekton-triggers-controller-75c764b8b8-jmwj4   1/1     Running   0          3d21h
tekton-triggers-webhook-5c8ffbc99d-vslv4      1/1     Running   0          3d21h
Source Code
All source codes that we are going to use in this article are stored in these two repositories:
- #1 Repo is the application located on github.
- #2 Repo is the CI/CD and the pipeline files located on github.
CI/CD Tools
Before we start installing the pipeline we need to install some tools that will support our pipeline execution. These tools will do some complementary work there in order to validate the application quality and speed up the building process before deploying the application. And these tools are:
- SonarQube Community: It will execute the validations on our source code according to our rules.
- Sonatype Nexus Community: It will cache our dependencies, so we won’t need to download them from their original repositories everytime we start a build.
Now let’s install them.
1st Step - Clone de repository
Clone the #2 Repo to your local machine in the folder that we will call [PIPELINE_HOME].
git clone https://github.com/mgohashi/deepdive-tekton.git
There will be many files and folders there, but you are only interested in these here:
[PIPELINE_HOME]
...
├── 12-complex-pipeline
│   ├── 0-operators
│   │   └── subscriptions.yml
│   ├── 1-cicd-tools
│   │   ├── 0-namespace.yml
│   │   ├── 1-nexus.yaml
│   │   └── 2-sonaqube.yml
│   ├── 2-pipeline
│   │   ├── 0-tasks.yml
│   │   ├── 1-complex-pipeline.yml
│   │   └── quality-gate-result.groovy
│   ├── 3-trigger
│   │   ├── 4-complex-trigger-template.yml
│   │   ├── 5-complex-eventlistener.yml
│   │   ├── 6-complex-trigger-binding.yml
│   │   └── 7-route.yml
│   ├── cleanup.sh
│   ├── gitpush.json
│   ├── simulate-webhook.sh
│   └── update.sh
...
12 directories, 43 files
NOTE
Now make sure you execute the following the commands from inside your copy of the [PIPELINE_HOME]/12-complex-pipeline folder.
2nd Step - Install the Nexus Operator
To install the operator we need to certify that we have the subscription for it.
The yaml file that is in the 0-operators folder is already with the right channel and configuration that we are looking for, so you can just apply it to your cluster using the following command:
oc apply -f 0-operators
NOTE We used oc because we have some yamls files that has some openshift only CRs otherwise we would be totally able to do it with our friend kubectl.
After executing this command you should see another ClusterServiceVersion being provisioned in the openshift-operators namespace.
kubectl get clusterserviceversion
The result will be something like:
NAME                                   DISPLAY                        VERSION    REPLACES   PHASE
nxrm-operator-certified.v3.23.0-1      Nexus Repository Operator      3.23.0-1              Succeeded
openshift-pipelines-operator.v0.11.2   OpenShift Pipelines Operator   0.11.2                Succeeded
3rd Step - Install the CI/CD tools
So, now we should install the CI/CD tools and for this we are going to create a namespace called cicd-tools and install the above-mentioned tools there.
oc apply -f 1-cicd-tools
NOTE Likewise the previous command that we used oc we needed to do this because this yaml files has some openshift only CRs otherwise we would be totally able to do it with our friend kubectl.
You should see that the apps are starting in the namespace cicd-tools.
kubectl get pods -n cicd-tools
The result will be something like:
NAME                                           READY   STATUS      RESTARTS   AGE
my-nexusrepo-sonatype-nexus-69ccdd4d44-zsdbw   1/1     Running     0          4d1h
my-sonarqube-1-7bcmk                           1/1     Running     0          19m
my-sonarqube-1-deploy                          0/1     Completed   0          19m
postgresql-my-sonarqube-1-deploy               0/1     Completed   0          19m
postgresql-my-sonarqube-1-q7258                1/1     Running     0          19m
And to check the ingress endpoint to access these tools run the following command:
For Nexus
kubectl get route/my-nexus -o jsonpath='http://{$.spec.host}'
And for SonarQube
kubectl get route/my-sonarqube -o jsonpath='http://{$.spec.host}'
The results will be something like:
http://my-nexus-cicd-tools.{FQDN}
http://my-sonarqube-cicd-tools.{FQDN}
{FQDN}can be whateverCRChas configured for you. For example:apps-crc.testing.
4th Step - Tools configuration
Now that you have properly installed tools, we can configure them. Since this is not an article about the demonstration of how to configure these tools, I will just paste here the expected results for some activities.
The default user and password for each tool will be:
| Tool | User / Password |
|---|---|
| Nexus Community | admin / admin123 |
| SonarQube Community | admin / admin |
There’s not so much we can do to configure here. But, the tools can have many different analysers or repositories private or not, that would be required to be there. But, to run this demonstration the default is sufficient.
Pipeline environment
The pipeline we are going to create has a few files that are worth detailing a bit more:
Considerations
Tasks - As we already mentioned before tasks are there to be used as a reusable code. These specific tasks are in some situations either just an extended version of others from the catalogs that I either had to customize to make then more flexible or to build one from scratch due to the very specialized situation of mine, such as, create a special package for the quarkus app.
git-clone: Generic task to clone the parameterized repository. You can check the list of parameters here;maven: Generic task to build maven projects. It is already taking a intermediaty Nexus Community mirror to download the artifacts. You can check the list of parameters here;openshift-client: A task to execute some commands to the Openshift API using the Openshift CLI oroc. You can check the list of parameters here;tar-quarkus: Generic task to build a single artifact for quarkus applications due to the fact that quarkus is not built using a single jar file, in other works, it does not generate auberjaror afatjarif you like;validate-quality-gate: Generic task to validate the code scan into against the SonarQube Community. This task shows how easy it is to create your own task and do whatever is necessary. I used a groovy image to do what I needed. You can check the list of parameters here;
The structure of a task is as follows. For the sake of simplicity I have removed some less important information, but you can find it in the repository in this link:
apiVersion: tekton.dev/v1beta1
kind: Task
metadata:
  name: maven
spec:
  params:
    ...
  steps:
    - image: registry.access.redhat.com/ubi8/ubi-minimal:latest
      name: mvn-settings
      resources: {}
      script: |
        #!/usr/bin/env bash

        [[ -f $(workspaces.maven-settings.path)/settings.xml ]] && \
        echo 'using existing $(workspaces.maven-settings.path)/settings.xml' && \
        cat $(workspaces.maven-settings.path)/settings.xml && exit 0

        ...

        [[ -f $(workspaces.maven-settings.path)/settings.xml ]] && cat $(workspaces.maven-settings.path)/settings.xml
        [[ -f $(workspaces.maven-settings.path)/settings.xml ]] || echo skipping settings
    - args:
        - -s
        - $(workspaces.maven-settings.path)/settings.xml
        - $(params.GOALS)
      command:
        - /usr/bin/mvn
      image: gcr.io/cloud-builders/mvn
      name: mvn-goals
      resources: {}
      workingDir: $(workspaces.source.path)
  workspaces:
    - name: source
    - name: maven-settings
    - name: local-repo
Let’s break it down to its main sections:
workspace: This is just a definition that we will need a persistent storage to put our files.params: This is the section that we add our parameters. We can have here some default values, so don’t worry if you define a lot to make it flexible enough for the use in a pipeline.steps: This is the section that we define what the step is going to actually do. It has some important attributes:name: The name of the step.image: The container image. Yes you can define your own container mage has what you need to do. You will notice that thevalidate-quality-gatetask has a groovy imagequay.io/dockerlibrary/groovyin its second step.script: A script that is executed inside the container.command: Can not be used in conjunection with script field. A command that is expected to run in the container.args: Can only used in conjunction with thecommandattribute. It defines a list of arguments to be appended to the command.
results: Some tasks define this attribute. This is used to store some important information in the container termination log. Up to this moment it has 2048 bytes or 80 lines as a defined limit, whichever is smaller.resources: Can be used to do perform some builtin tasks. Such as, clone a git repository or export the image to a repository. But, after reviewing many of the advantages and disadivantages, that will be described in the conclusion of our article, I chose not to use them.
NOTE There are a lot more attributes to check it out at tekton’s documentation in the link.
Now let’s delve into a pipeline structure. Just like the other above for the sake of simplicity I have removed some less important information. But, you can find it in the repository in this link:
apiVersion: tekton.dev/v1beta1
kind: Pipeline
metadata:
  name: complex-pipeline
spec:
  params:
    - name: gitrepositoryurl
      type: string
      description: Git Repo
    - name: gitrevision
      type: string
      description: Git Repo
      default: master
  workspaces:
    - name: maven-settings
    - name: shared-workspace
    - name: shared-repo
  tasks:
    - name: git-clone
      taskRef:
        name: git-clone
      params:
      ...
      workspaces:
        - name: output
          workspace: shared-workspace
    - name: build
      taskRef:
        name: maven
      ...
      runAfter:
        - git-clone
      workspaces:
        - name: maven-settings
          workspace: maven-settings
        - name: source
          workspace: shared-workspace
        - name: local-repo
          workspace: shared-repo
    - name: tests
      taskRef:
        name: maven
      ...
      runAfter:
        - build
      ...
    - name: static-code-analysis
      taskRef:
        name: maven
      ...
      runAfter:
        - build
      ...
    - name: validate-quality-gate
      taskRef:
        name: validate-quality-gate
      ...
      runAfter:
        - static-code-analysis
      ...
    - name: build-package
      taskRef:
        name: tar-quarkus
      runAfter:
        - tests
        - validate-quality-gate
      ...
    - name: build-image
      taskRef:
        name: openshift-client
      ...
      runAfter:
        - build-package
      ...
    - name: setup-app
      taskRef:
        name: openshift-client
      ...
      runAfter:
        - build-image
      ...
    - name: deploy
      taskRef:
        name: openshift-client
      ...
      runAfter:
        - setup-app
      ...
After breaking down this pipeline we will find the following sections:
params: This section is where we define our parameters. Parameters in Tekton can be of two types:StringandArrayofStrings-
workspace: This section is where we define that we are going to need some persistent storage to save our files between each task.INFO Remember that we mentioned that each task is going to be a pod? Right, and that’s because each pod can start and run in different nodes and even if they have been eventually provisioned in the same node, their filesystem are volatile, so it disappear after it completes its execution.
tasks: This section is where we define our tasks. We can refer to those tasks above-mentioned or we can create one from scratch right in this section. Each task will have its set of parameters and volumes, but how we tell then work like a chain? That’s what therunAfterattribute does. This attribute accepts a list of tasks. So, you can have multiple tasks running in parallel. And that’s what we do with the taskstests, and the other twostatic-code-analysisandvalidate-quality-gate. These both sets of tasks will run in parallel.
Creating the pipeline environment
So, let’s create a namespace for our pipeline. Which can also be where we provision our applications components in a real environment.
kubectl create ns pipelines-tutorial
Just for the sake of not making any mistakes. Let’s now change our context to the namespace we have just created.
NOTE
Here you can use a kubectl plugin to make it easier kubectl ns {namespace} or just oc project {namepsace}, if you prefer.
kubectl config set-context --current --namespace=pipelines-tutorial
Once you create this namespace the Openshift Pipelines Operator automatically adds and configures a pipeline service account that has permissions to build and push an image. This service account is used by pipelineruns.
Creating pipeline
At this point you can start creating the pipeline. This command will create Tasks, the Pipeline, and Persistent Volumes that we are going to require.
kubectl apply -f 2-pipeline
And the result will be something like:
persistentvolumeclaim/shared-workspace created
persistentvolumeclaim/shared-repo created
buildconfig.build.openshift.io/basic-quarkus-app created
imagestream.image.openshift.io/basic-quarkus-app created
task.tekton.dev/git-clone created
task.tekton.dev/maven created
task.tekton.dev/openshift-client created
task.tekton.dev/tar-quarkus created
task.tekton.dev/validate-quality-gate created
pipeline.tekton.dev/complex-pipeline created
Once you have created your pipeline you can already see what has been created using the tekton cli or tkn.
We can list the existing cluster tasks
$ tkn clustertasks ls
NAME                       DESCRIPTION   AGE
buildah                                  5 days ago
buildah-v0-11-3                          5 days ago
...
We can list the existing tasks that are installed in this namespace.
$ tkn tasks ls
NAME                    DESCRIPTION   AGE
git-clone                             2 minutes ago
maven                                 2 minutes ago
openshift-client                      2 minutes ago
tar-quarkus                           2 minutes ago
validate-quality-gate                 2 minutes ago
We can list the pipelines that were created in this namespace.
$ tkn pipeline ls
NAME               AGE             LAST RUN   STARTED   DURATION   STATUS
complex-pipeline   2 minutes ago   ---        ---       ---        ---
We can describe de pipeline complex-pipeline to see its resources, parameters, tasks, and pipelineruns.
$ tkn pipeline describe complex-pipeline
Name:        complex-pipeline
Namespace:   pipelines-tutorial

📦 Resources

 No resources

⚓ Params

 NAME                 TYPE     DESCRIPTION   DEFAULT VALUE
 ∙ gitrepositoryurl   string   Git Repo      ---
 ∙ gitrevision        string   Git Repo      master

🗒  Tasks

 NAME                      TASKREF                 RUNAFTER
 ∙ git-clone               git-clone
 ∙ build                   maven                   git-clone
 ∙ tests                   maven                   build
 ∙ static-code-analysis    maven                   build
 ∙ validate-quality-gate   validate-quality-gate   static-code-analysis
 ∙ build-package           tar-quarkus             tests, validate-quality-gate
 ∙ build-image             openshift-client        build-package
 ∙ setup-app               openshift-client        build-image
 ∙ deploy                  openshift-client        setup-app

⛩  PipelineRuns

 No pipelineruns
But, if you try to see if there’s is any pipeline running, you will not find anything yet. This is because we did’t started any one yet. To do so we have two alternatives:
- Create a
PipelineRunwith all the required inputs, outputs, and persistent volumes. - Create a
Trigger - Event listernerand a couple of other configurations to make it ready to receive webhooks from GitHub, for instance.
So, you are a lucky guy! We will go through both of them you how to run with the command line and by using triggers. Triggers are going to be covered in the next secion, so let’s try starting our pipeline manually.
Start the pipelines using CLI
Let’s start the pipeline from the command line will be as easy as described in the following command:
tkn pipeline start complex-pipeline \
  -p gitrepositoryurl=https://github.com/mgo-dev-mode/basic-quarkus-app \
  -w name=maven-settings,emptyDir="" \
  -w name=shared-workspace,claimName=shared-workspace,subPath="" \
  -w name=shared-repo,claimName=shared-repo,subPath=""
complex-pipeline: is the name of the pipeline;-p: Informs the only required parameter that is the git repository URL;-w: Informs all workspaces and their PVCs that we created when we installed the pipeline. The syntax is is like this:- For PVCs:
name=[WORKSPACE_NAME],claimName=[PVC_NAME],subPath=[PVC_SUB_PATH_TO_BE_MOUNTED] - For Secrets:
name=[WORKSPACE_NAME],secret=[SECRET_NAME] - For ConfigMaps:
name=[WORKSPACE_NAME],config=[CONFIG_MAP_NAME],item=[KEY]
- For PVCs:
You can find more options here.
Once you start the pipeline you can see its logs using the following command:
NOTE This command comes in handy when you need to see the logs of all tasks runs.
tkn pr logs -L -f
And the result will be similar to this:
Creating triggers
Regarding triggers you will see that we have three different files that are worth to have some description.
TriggerTemplate: is an element that define what will be the parameters, and PipelineRuns templates (here you can have as many as you want), and of course as we are talking about PipelineRuns we need to define all the resources (input and outputs) and the PersistenceVolumeClaims that are going to be bound to the defined workspaces, if there is any requirement for that, and our pipeline does require a few;TriggerBinding: is an element that extract which attributes are necessary to bootstrap the pipeline. It uses a syntax very similar to JsonPath with$(body.key)or$(header.key)and uses.(dots) to access each key individualy inside the json. For more details see this link.EventListers: is an element that is used to process HTTP based events with JSON payloads. This element needs to be combined with both elements mentioned above:TriggerTemplateandTriggerBindning.
So now let’s create the triggers.
kubectl apply -f 3-trigger
Simulate a push event from Github
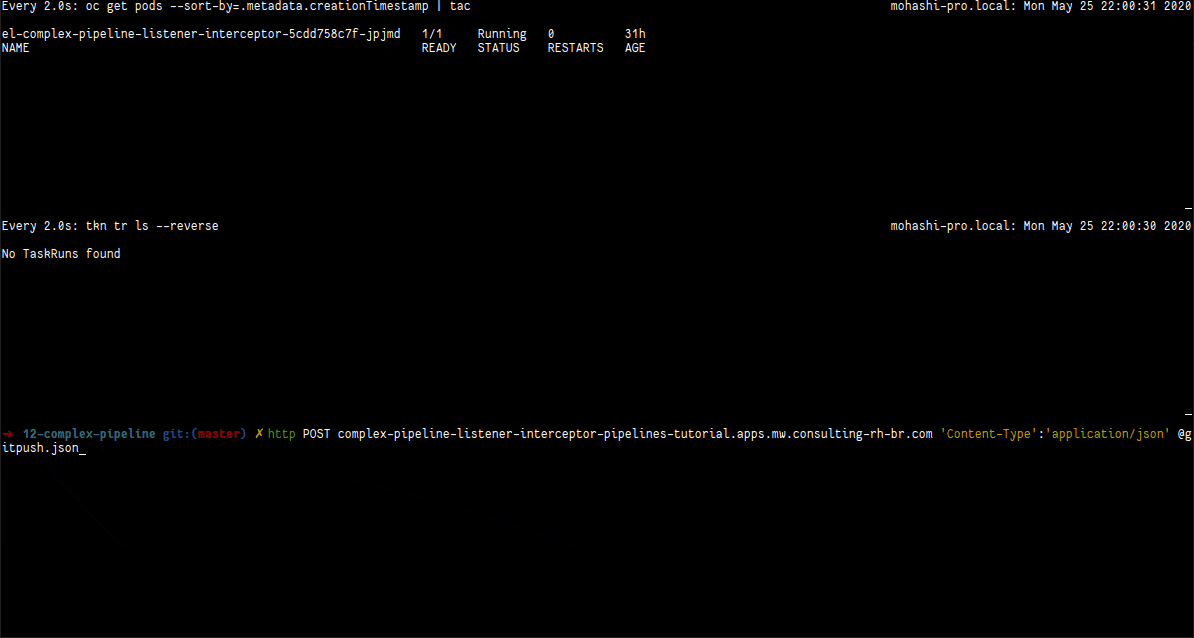
Now let’s simulate the webhook:
NOTE We are going to use a tool called httpie.
http POST complex-pipeline-listener-interceptor-pipelines-tutorial.[FQDN] \
'Content-Type':'application/json' @gitpush.json
And the result will be something like:
Content-Type':'application/json' @gitpush.json
HTTP/1.1 201 Created
content-length: 109
content-type: text/plain; charset=utf-8
date: Mon, 25 May 2020 22:44:19 GMT
set-cookie: b91e1d0c23621fb276e284974607bad4=ecbe8730ee157a849b9ce38e10cdf2ac; path=/; HttpOnly

{
    "eventID": "87sb6",
    "eventListener": "complex-pipeline-listener-interceptor",
    "namespace": "pipelines-tutorial"
}
In the following video we have three terminals: (1) is with the existing pods in the namespace; (2) is with the taskruns that are being created; (3) is the pipeline logs being showed. It begins with the webhook being triggered using the command above and then changes to the pipelinerun log.
Web Console
In the Web Console it is possible to see the entirely new section for the pipelines.
This is how pipelines are listed:
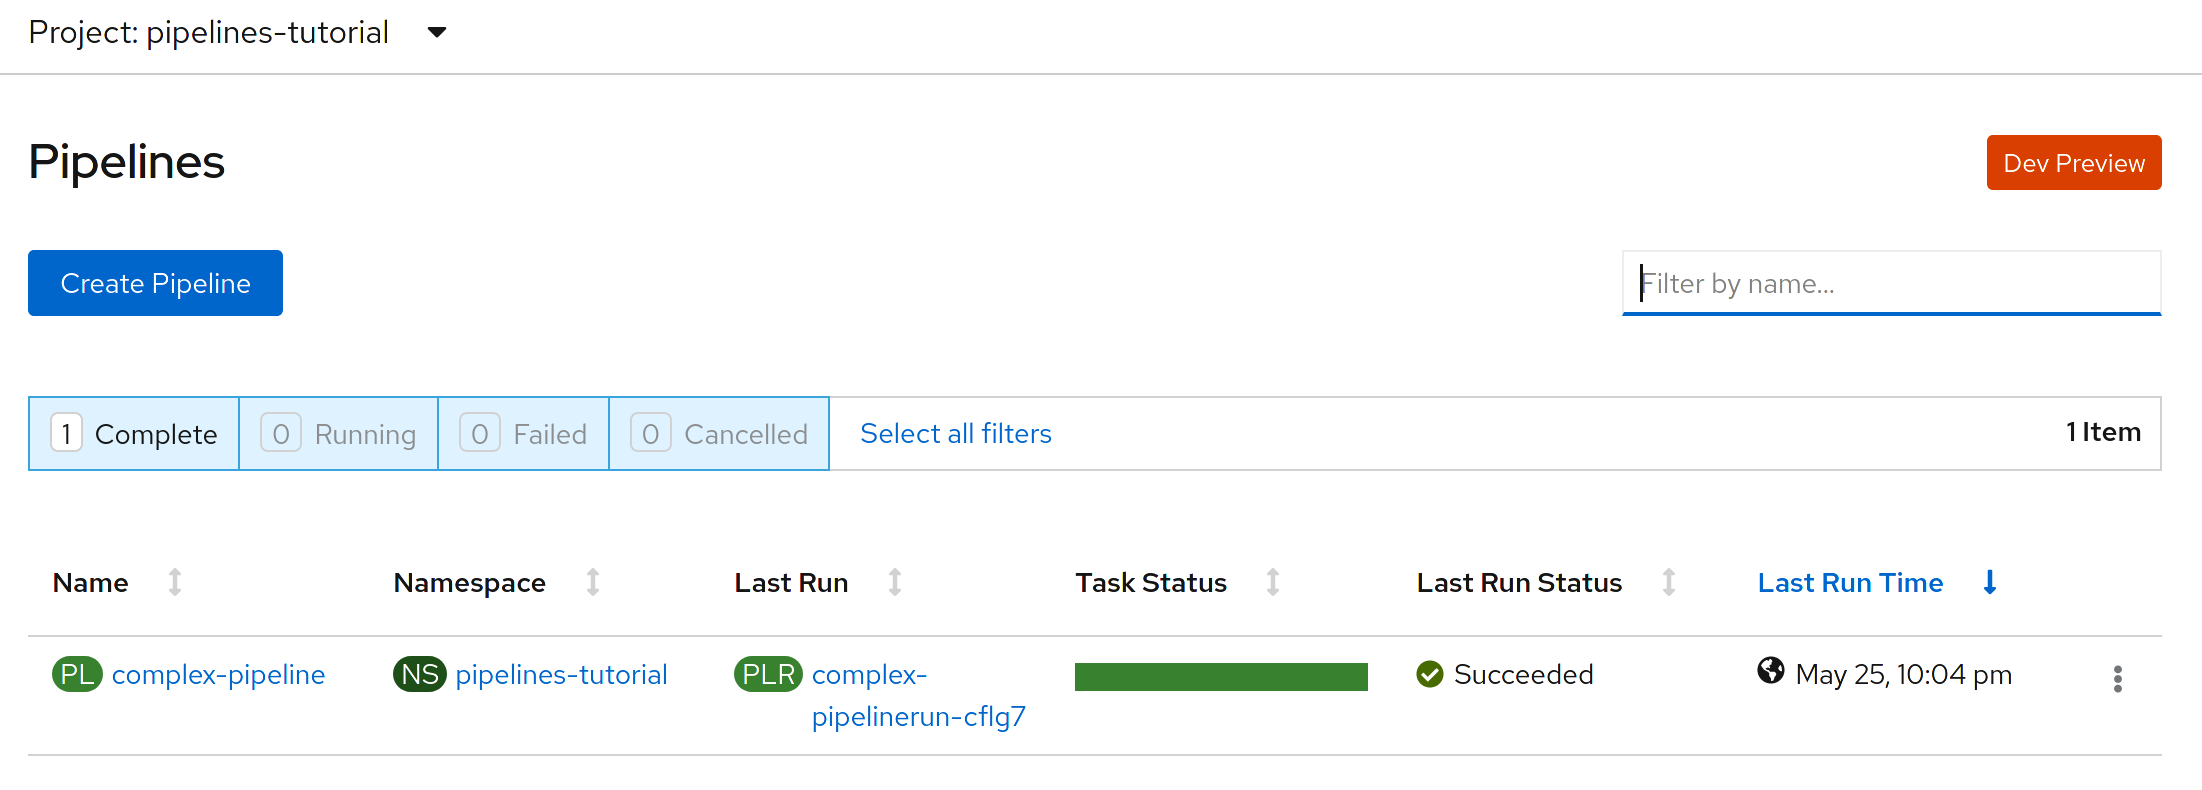
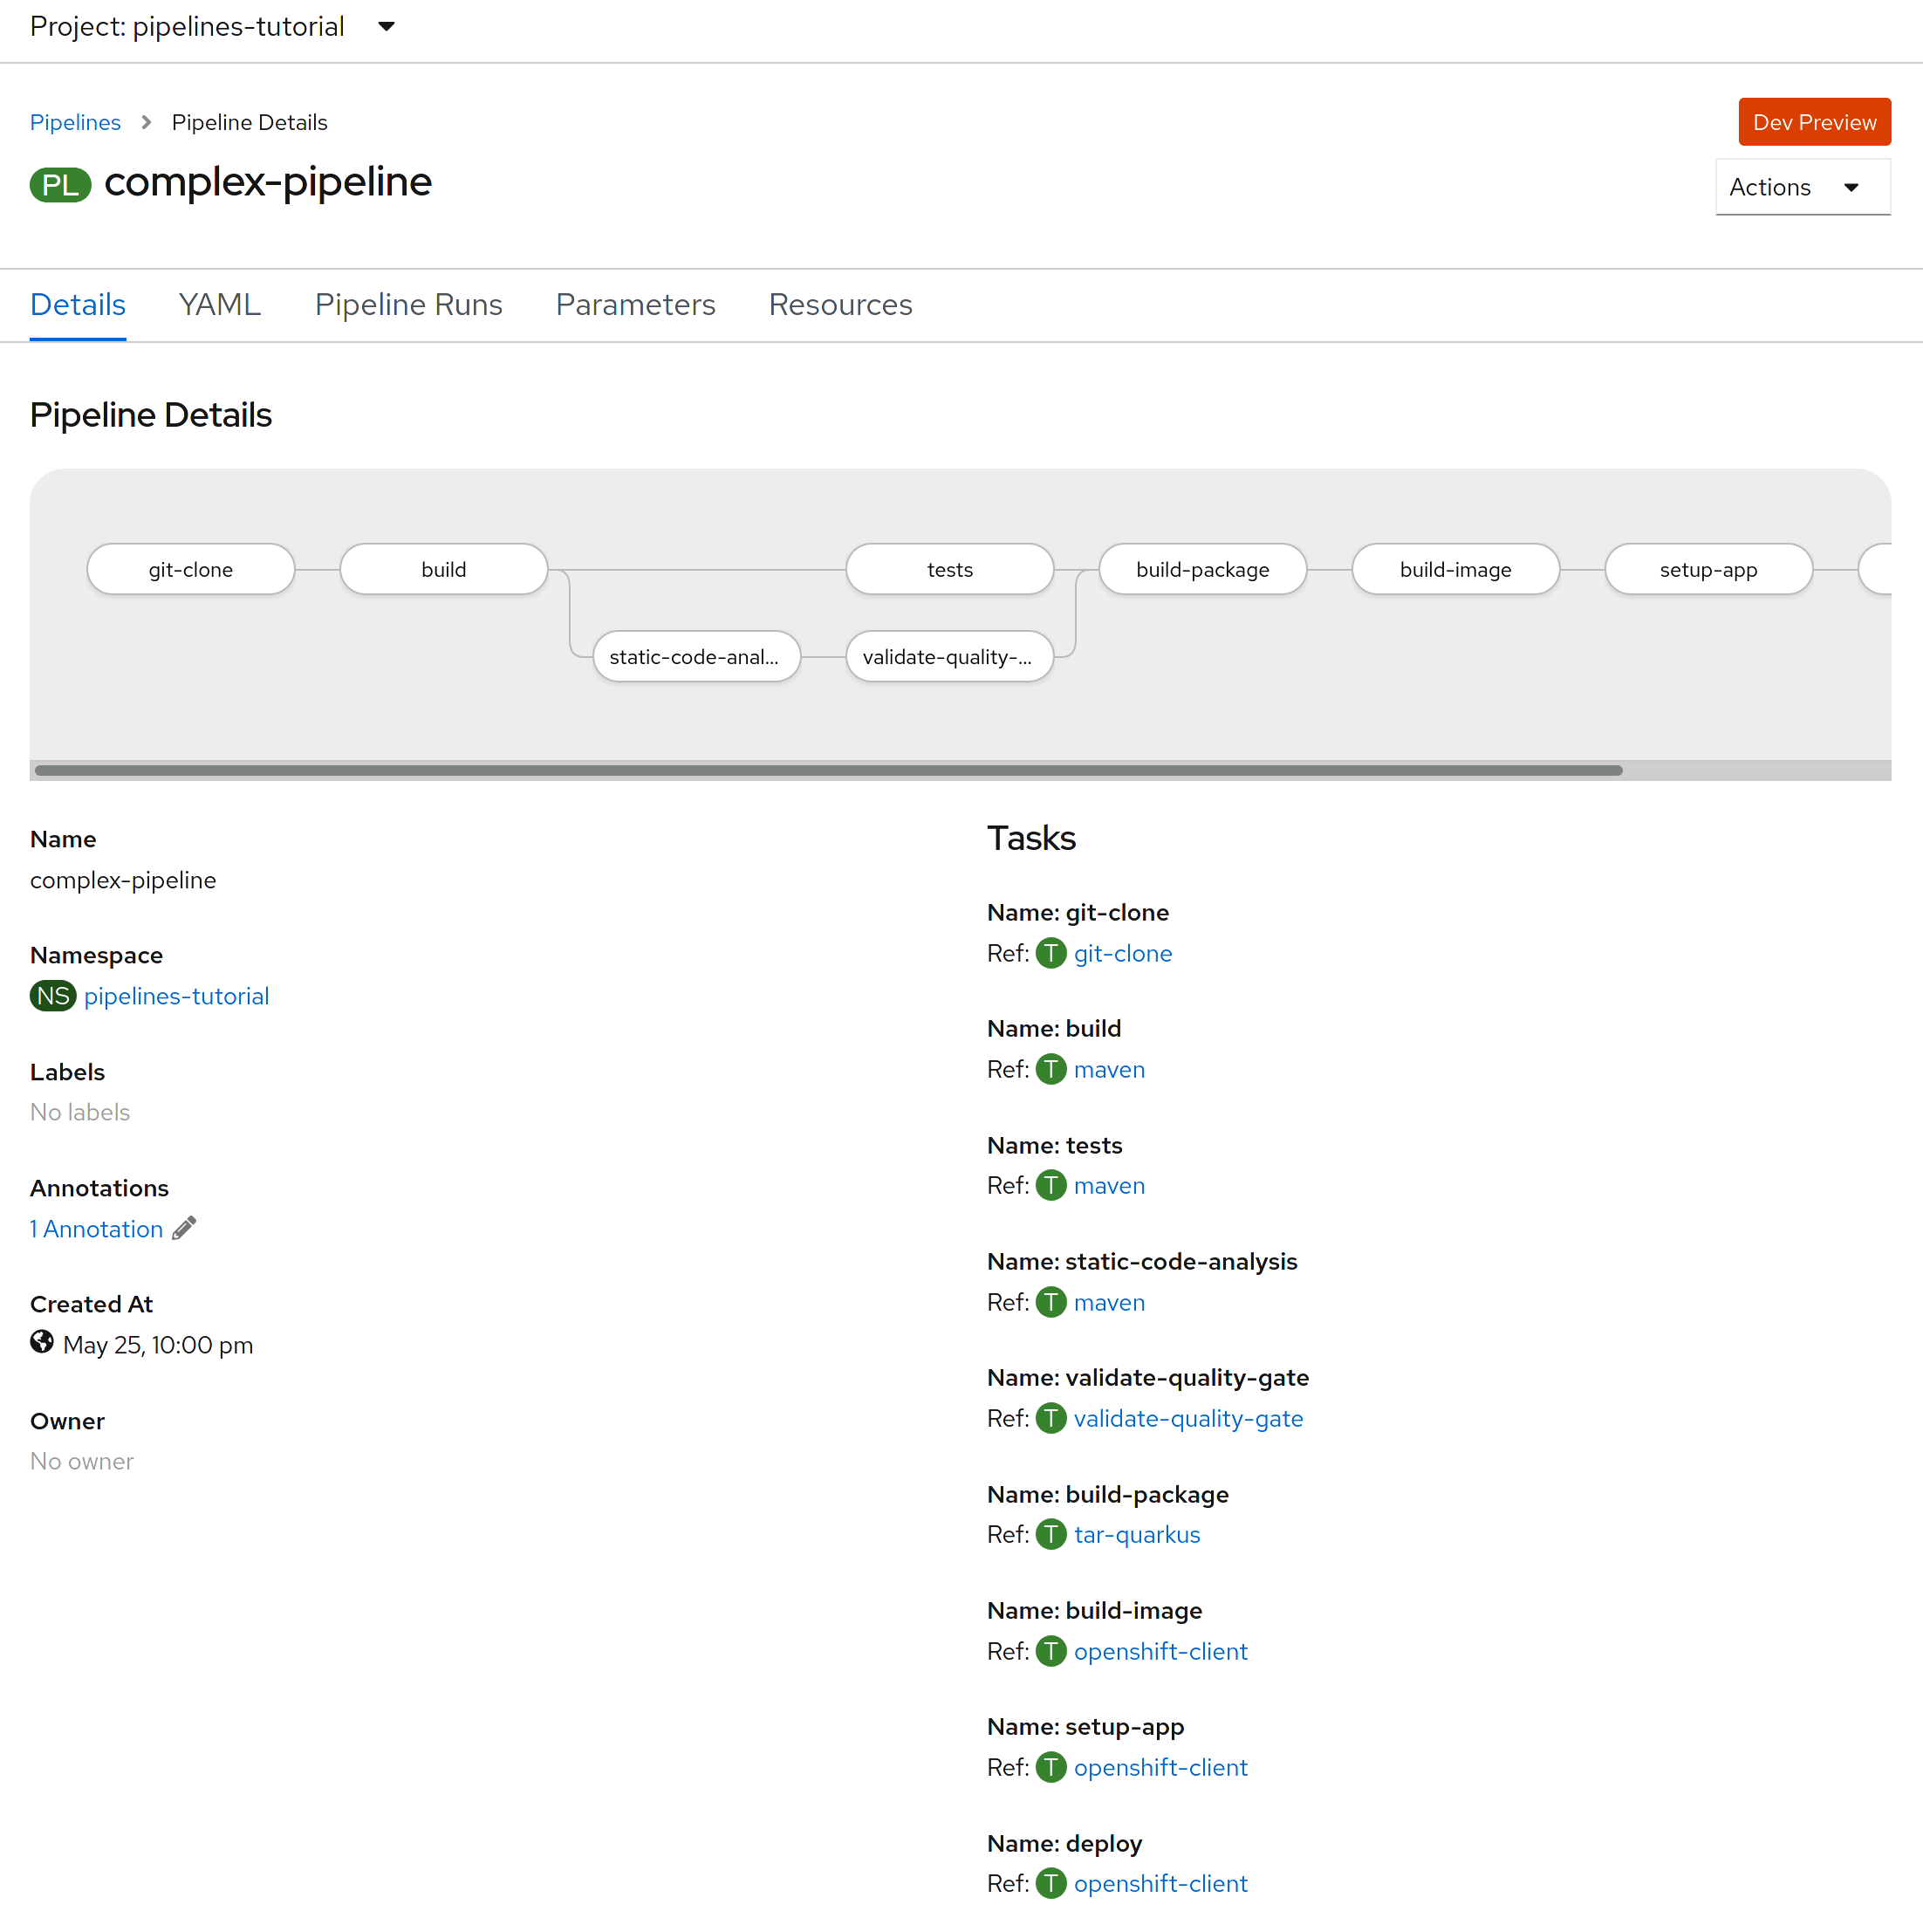
This is how the details of the pipeline is shown:
This is how pipelineruns are listed:
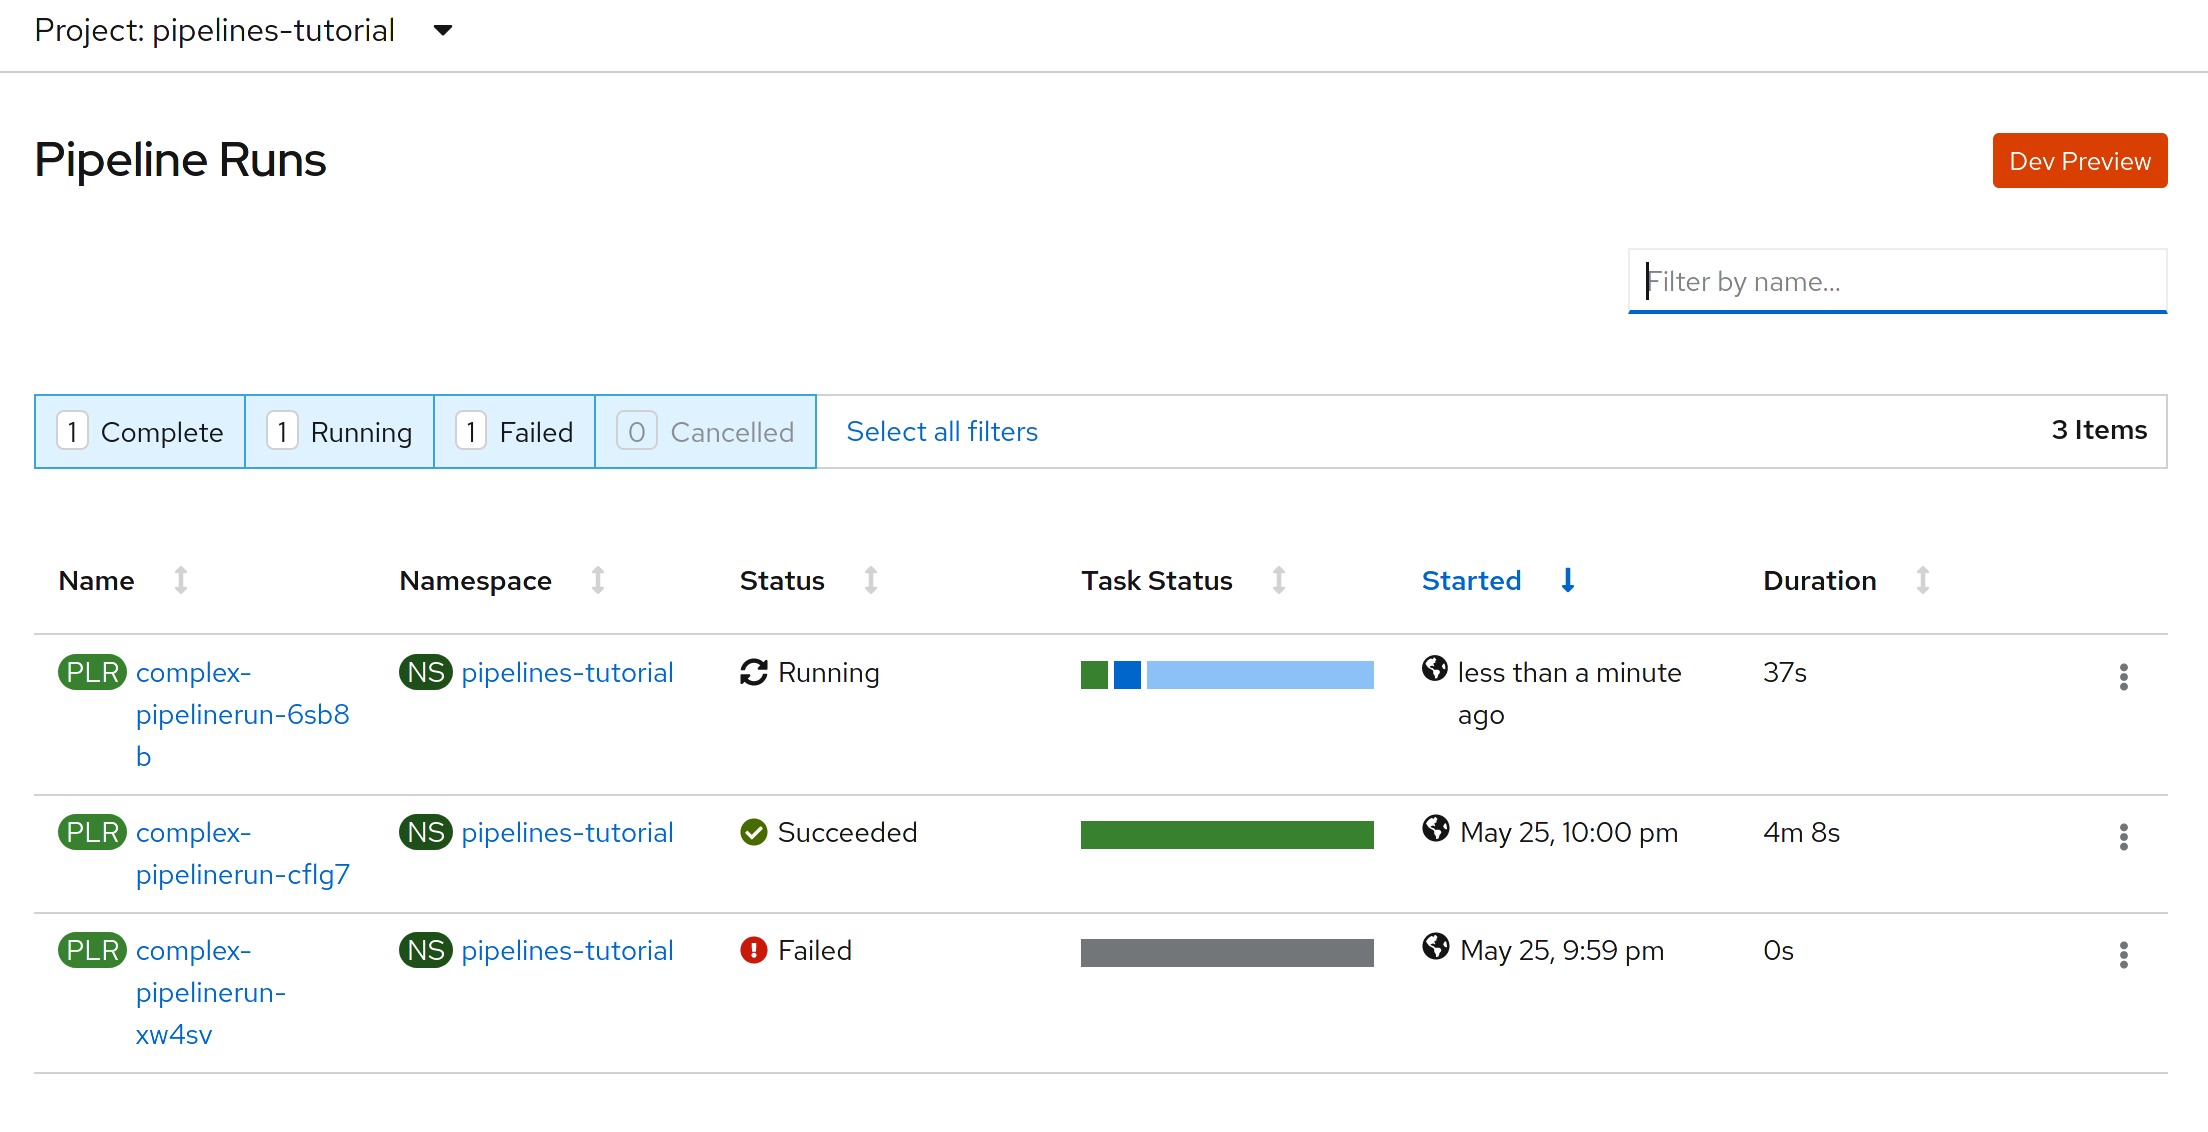
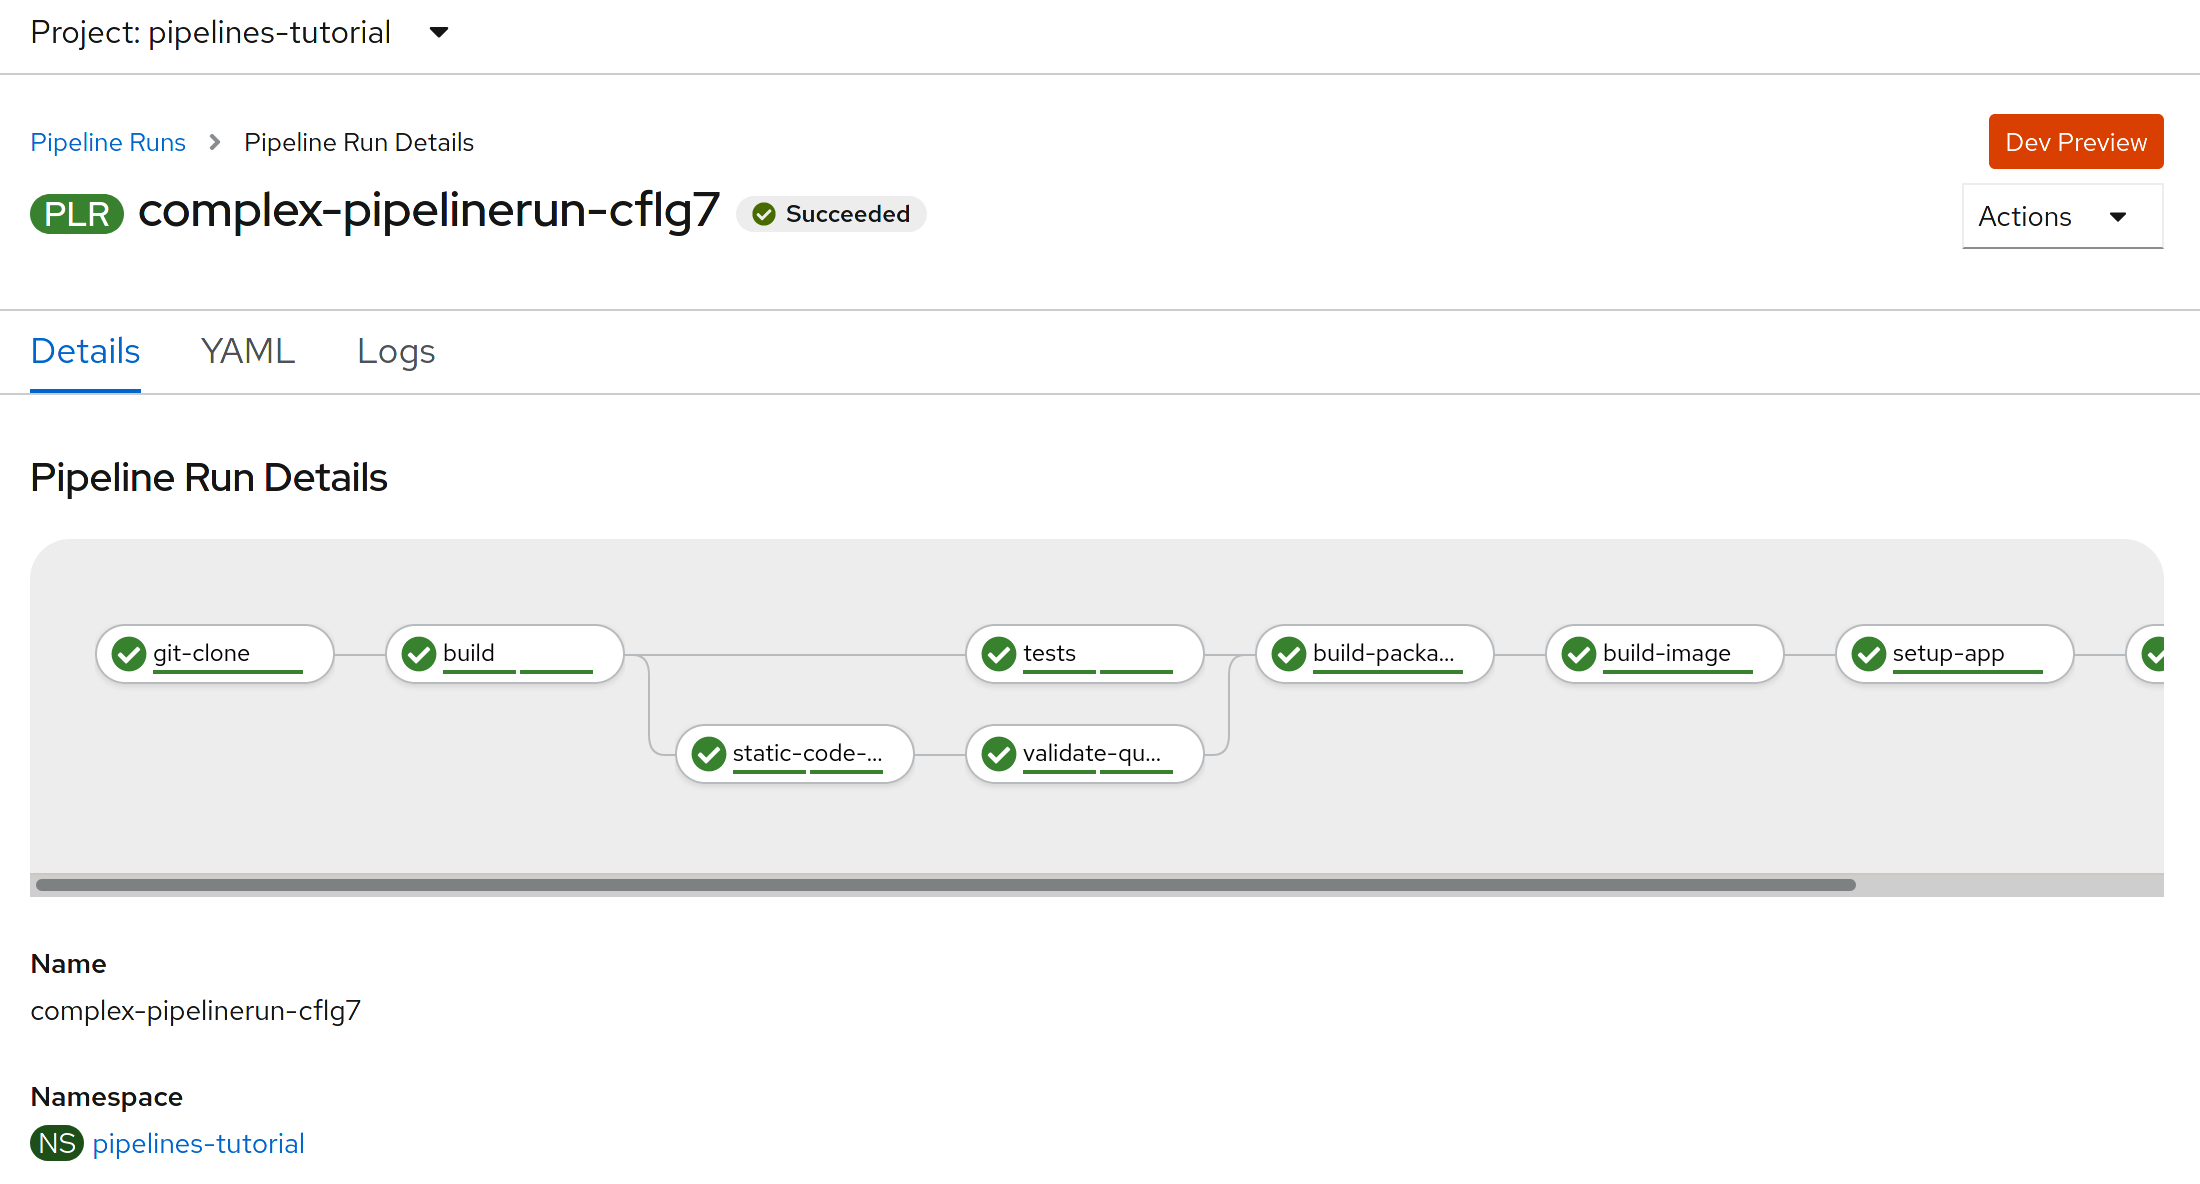
This is how pipelineruns look like after a successful run:
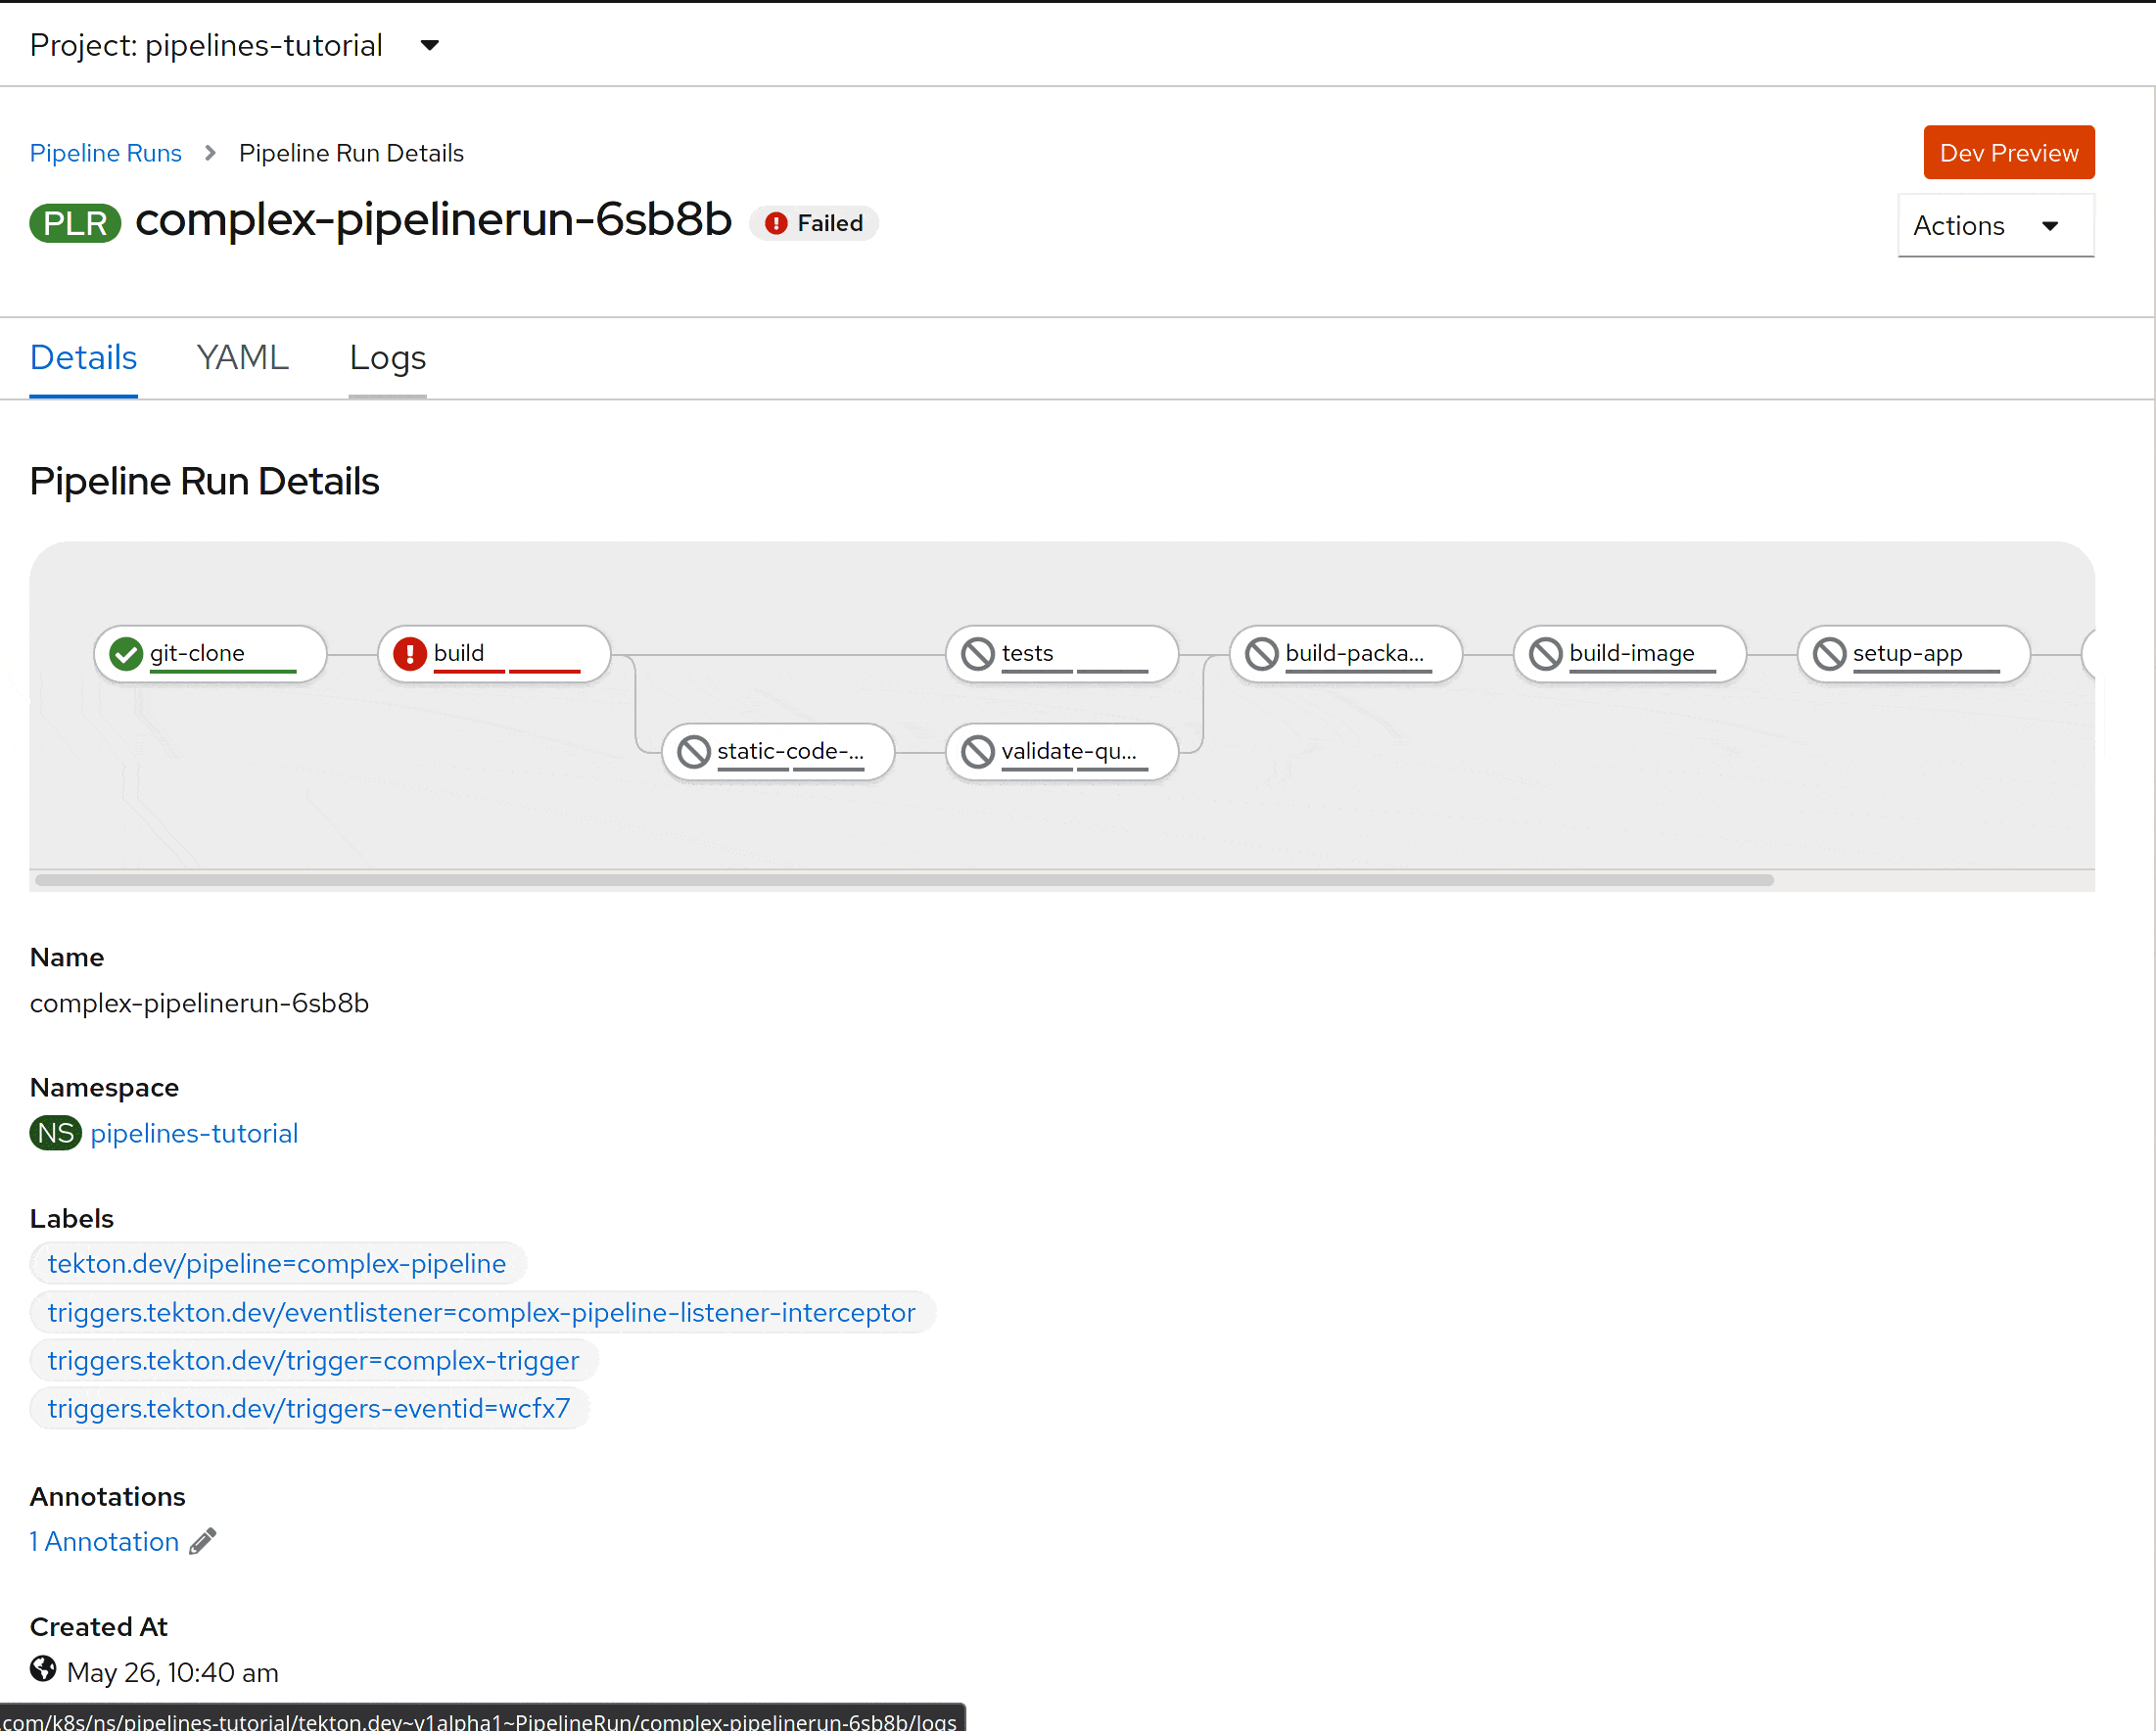
This is how pipelineruns look like after an error occur:
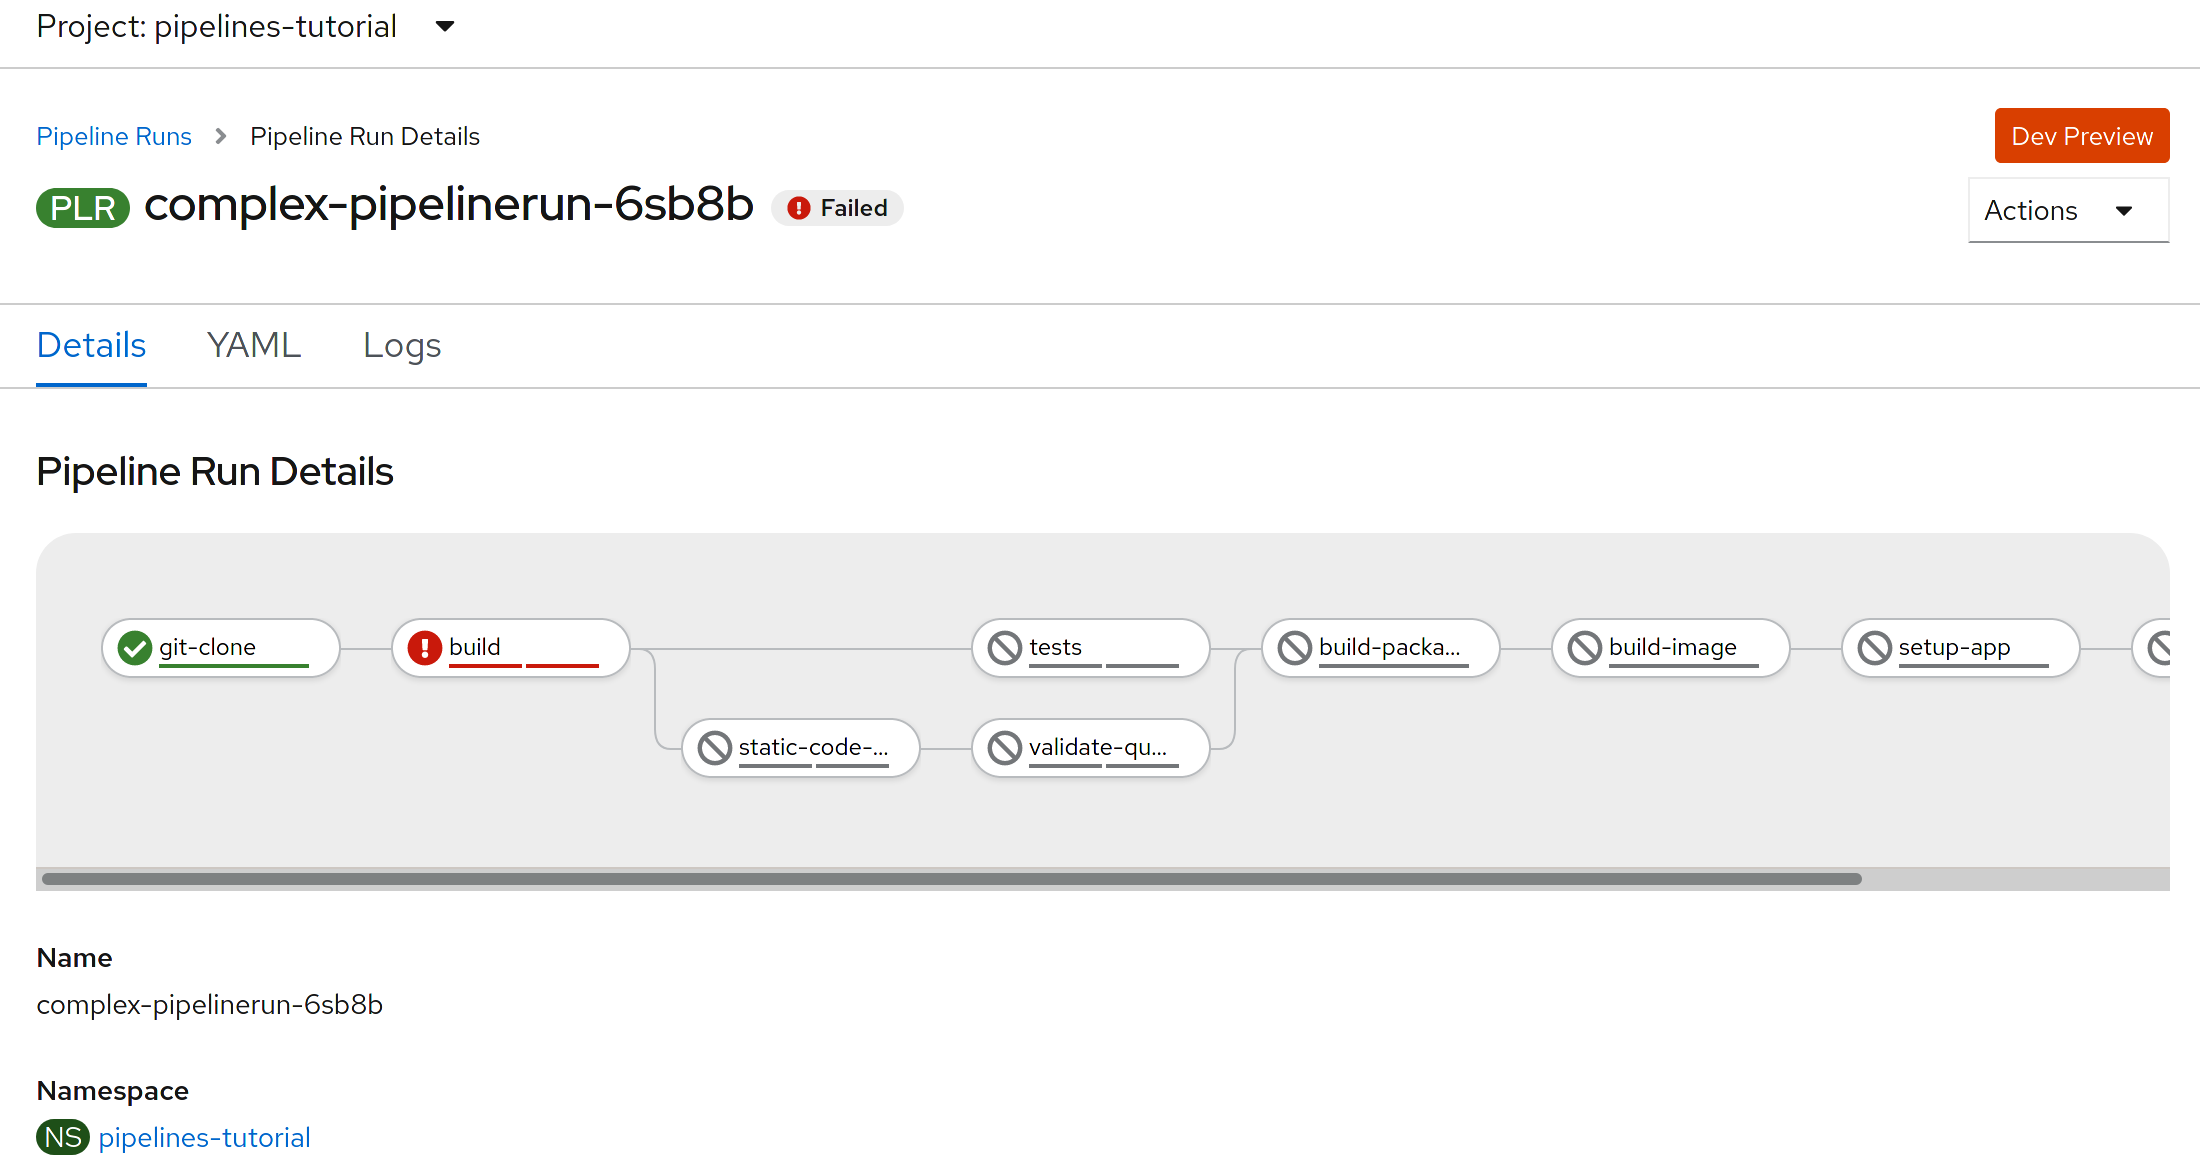
You can also see the logs in the PipelineRun
Conclusion
It is really worth it to try this new way of creating a Cloud Native pipeline. It is easy, less centralized, light weight, and much more flexible then other tools cause each step can create a totally different environment for your application.
On the other hand there are some minor issues like there is no support for human approval like the one we commonly have been using in Jenkins. There is a github issue in the backlog to provide this feature.
Things that I didn’t use in this implementation were the PipelineResources. They really seem to be very useful, but there are some issues that made me rethink its use in this specific scenario. And here follow my findings:
- Git Resource: The issue was regarding its current features, it doesn’t have the same features as the ones provided by the Tektons catalog. But I think that Tekton community is probably going to improve this. Either way as stated by the group in this repository they will be offering replacement tasks for pipeline resources due to the decision of keeping PipelineResources in alpha as mentioned here.
- Image Resource: The issue was that all build images require us to relax the security to let them execute in a priviledged environment. This is something that I rather didn’t want to do. So, I chose to create a binary source-to-image build that does not have any requirement for priviledged access. It has also many other advantages. We also have s2i builds there in the Openshift and Tekton catalog, but they seem to also require priviledged access.
Despite those minor issues I think that creating those pipelines were fun and absolutely worth the time spent. The Tekton’s community has been doing a great job and of course Red Hat is also working hard to integrate their tools with it. Let’s see what the future of these technologies hold.
And you stay tuned for more articles like this. If you liked it, please share!
Comments